
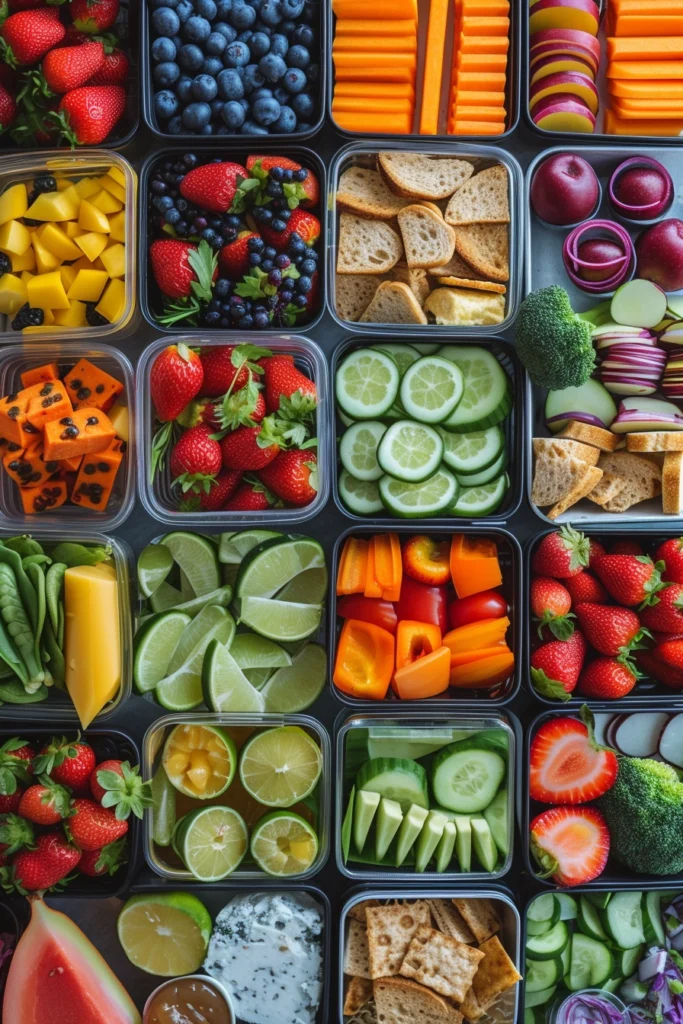
Packing lunch for school can be a daily challenge, especially when you want to make sure your kids are eating healthy and enjoying their meals. But fear not, we’ve got you covered with these 30 creative lunch box ideas that are not only nutritious but also kid-approved.


Say goodbye to boring sandwiches and embrace a variety of flavors, textures, and colors to keep your little ones excited about lunchtime. Whether your child is a picky eater or an adventurous one, there’s something here for everyone.

Grilled Bratwurst And Vegetable Shish Kabob Skewers
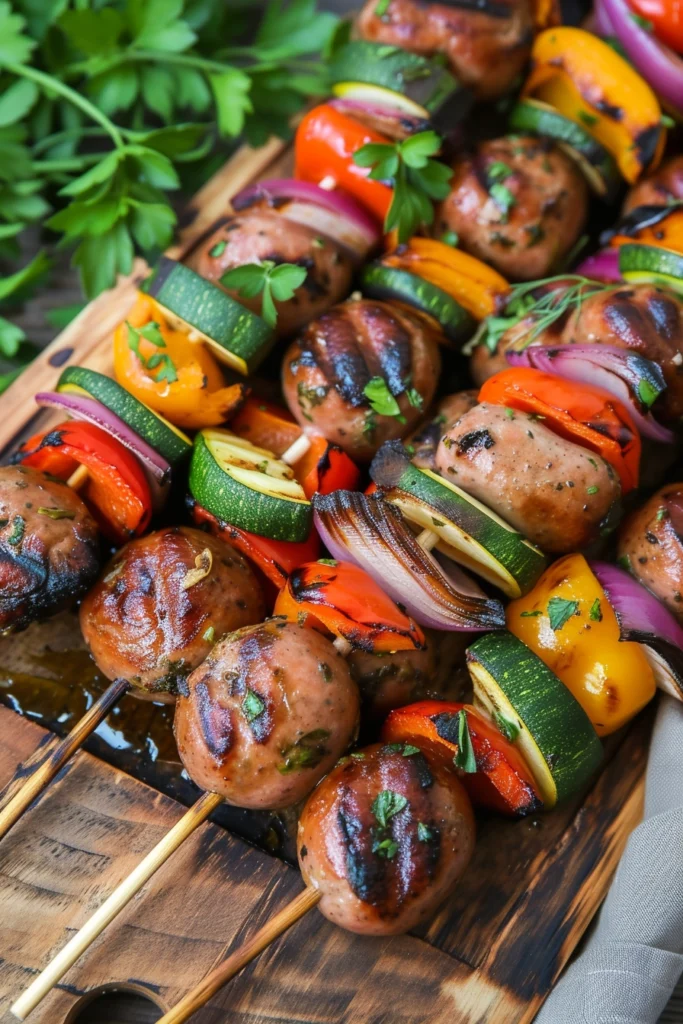
For a fun and tasty lunch, try making grilled bratwurst and vegetable shish kabob skewers. This meal is easy to prepare ahead of time and can be customized with your favorite veggies.
Ingredients:
- Bratwurst sausages (cut into 1-inch pieces)
- Bell peppers (various colors, cut into chunks)
- Onion (cut into chunks)
- Zucchini (sliced)
- Cherry tomatoes
- Olive oil
- Salt and pepper
- Wooden or metal skewers
Instructions:
- Preheat your grill to medium-high heat. Soak wooden skewers in water for at least 30 minutes to prevent burning if you’re using them.
- In a large bowl, toss the bratwurst and vegetables with olive oil, salt, and pepper until everything is evenly coated.
- Thread the sausage and vegetables onto the skewers, alternating between the bratwurst and different veggies.
- Place the skewers on the hot grill, turning occasionally. Grill for 10-15 minutes or until the bratwurst is cooked through and the vegetables are tender and lightly charred.
- Allow the skewers to cool before packing into a lunch box. They can be enjoyed at room temperature or reheated if preferred.
Pair these skewers with a side of whole-grain bread and a piece of fresh fruit for a complete and satisfying school lunch.
Pizza Pancakes

Pizza pancakes offer a playful twist on a classic lunch staple, combining the beloved flavors of pizza with the convenience of a pancake. They are a fun and customizable option for your lunchbox.
Ingredients:
- 1 cup all-purpose flour
- 2 tsp baking powder
- 1 tsp Italian seasoning
- 1/2 tsp garlic powder
- 1 cup milk
- 1 egg
- 1 tbsp olive oil
- 1/2 cup pepperoni, chopped
- 1/2 cup shredded mozzarella cheese
- Your favorite pizza toppings (e.g., diced bell peppers, mushrooms)
- Pizza sauce for dipping
Instructions:
- In a large bowl, whisk together flour, baking powder, Italian seasoning, and garlic powder.
- In another bowl, combine milk, egg, and olive oil.
- Pour the wet ingredients into the dry ingredients and stir until just combined.
- Fold in the pepperoni and mozzarella, along with any additional pizza toppings you desire.
- Heat a non-stick skillet over medium heat and scoop 1/4 cup of batter for each pancake.
- Cook until you see bubbles forming on the surface, then flip and cook the other side until golden.
- Serve with a side of warm pizza sauce for dipping.
Remember to let your pizza pancakes cool before packing them into your lunchbox. You can enjoy them at room temperature or reheat before eating, whichever you prefer. These savory pancakes are a delightful way to shake up your lunch routine with a hint of pizza goodness.
Mac And Cheese Muffins

Mac and Cheese Muffins are a creative twist on a classic favorite, making them perfect for a school lunch. They are portable, easy to make, and can be customized to your liking.
Ingredients:
- 2 cups cooked macaroni
- 1 tablespoon butter
- 1 tablespoon all-purpose flour
- 1 cup milk
- 2 cups shredded cheddar cheese
- 1 egg, beaten
- 1/2 cup breadcrumbs
- Salt and pepper to taste
Instructions:
- Preheat your oven to 375°F (190°C). Grease a muffin tin with butter or non-stick spray.
- In a pan, melt the butter over medium heat. Stir in the flour until smooth and gradually add milk. Cook until the mixture thickens.
- Remove the pan from the heat, add 1 1/2 cups of cheese until melted. Season with salt and pepper.
- Mix the cheese sauce with the cooked macaroni and the beaten egg until well combined.
- Spoon the mac and cheese into the muffin tin. Sprinkle with the remaining cheese and breadcrumbs for a crispy top.
- Bake for 15-20 minutes, or until the tops are golden brown and the muffins are set.
- Allow cooling slightly before removing from the tin. Serve warm or at room temperature.
Pack these in your child’s lunchbox with some fruit, veggies, and a dip for a balanced meal. Enjoy the ease of lunch preparation with these grab-and-go Mac and Cheese Muffins!
Chicken Ranch Roll-Ups
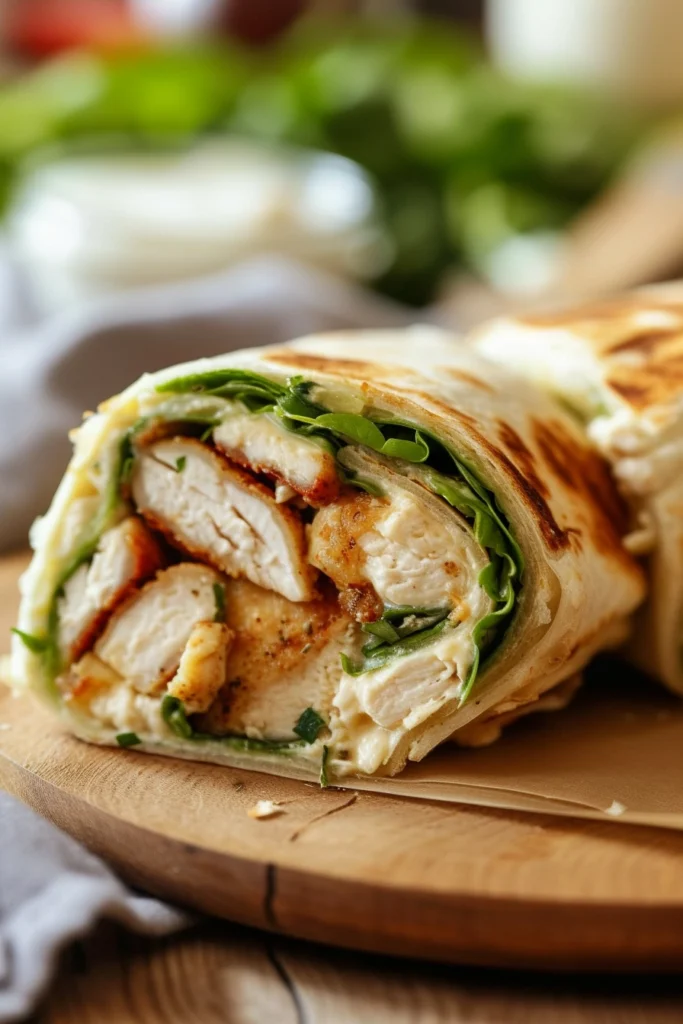
For a delightful school lunch, your kids will love Chicken Ranch Roll-Ups. They are easy to prepare and packed with flavor. Here’s how to make them:
Ingredients:
- 2 large chicken breasts, cooked and shredded
- 1/2 cup ranch dressing
- 1/4 cup shredded Cheddar cheese
- 2 tablespoons chopped fresh dill
- 4 large flour tortillas
- 1/2 cup lettuce, chopped (optional)
- 1/4 cup diced tomato (optional)
Instructions:
- In a bowl, mix together your shredded chicken and ranch dressing until the chicken is well coated.
- Add in the shredded Cheddar cheese and fresh dill. Stir to combine these ingredients thoroughly.
- Spread the chicken mixture evenly over the flour tortillas, leaving a small border around the edges.
- If you’re including lettuce and tomato, sprinkle them on top of the chicken mixture now.
- Carefully roll up the tortillas tightly so the filling stays inside.
- Cut the rolls into 1-inch slices or leave them whole. To keep the rolls secure until lunchtime, you might want to wrap them in parchment paper.
These roll-ups can be customized to include your favorite veggies or whatever is on hand. Remember to keep them refrigerated if you’re packing them for later. Enjoy your tasty and nutritious lunch!
Apple Cheese Wraps
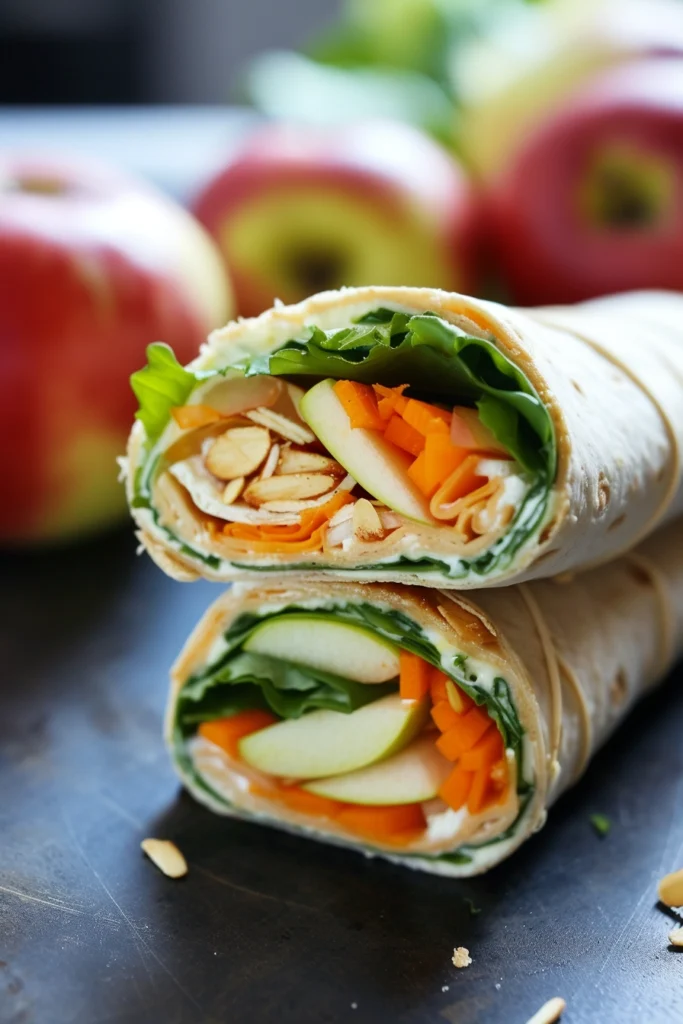
For a fun and healthy lunch option, try apple cheese wraps. They’re easy to make and perfect for a school lunch box.
Ingredients:
- 1 large apple
- 2 slices of your favorite cheese (e.g., cheddar, Swiss)
- 2 large whole wheat tortillas
- Lettuce leaves (optional)
- 1 teaspoon of honey
- A pinch of cinnamon (optional)
Instructions:
-
Prepare the Apple: Core the apple and slice it into thin rounds. If you prefer, you can also cut them into thin wedges.
-
Assemble the Wraps: Lay out the tortillas on a clean surface. If you’re using lettuce, place a leaf on each tortilla. This can help prevent the tortilla from becoming soggy.
-
Add Cheese and Apple: Place a slice of cheese on top of the lettuce, then arrange several apple slices over the cheese. Drizzle a teaspoon of honey over the apples and sprinkle a pinch of cinnamon for added flavor.
-
Wrap it Up: Carefully fold in the sides of the tortilla and roll it up tightly, starting from the edge closest to you. Slice the wrap in half to make it easier to pack and eat.
-
Pack: Place the wraps in your lunch box. To keep them fresh, you can wrap them in parchment paper or place them in a reusable sandwich bag.
Apple cheese wraps provide a good balance of carbohydrates, protein, and fresh fruit to keep you energized throughout the school day. They’re customizable, so feel free to add in other fruits or swap the honey for a sprinkle of your preferred sweetener. Enjoy your delicious and wholesome lunch!
Tortilla Pizza
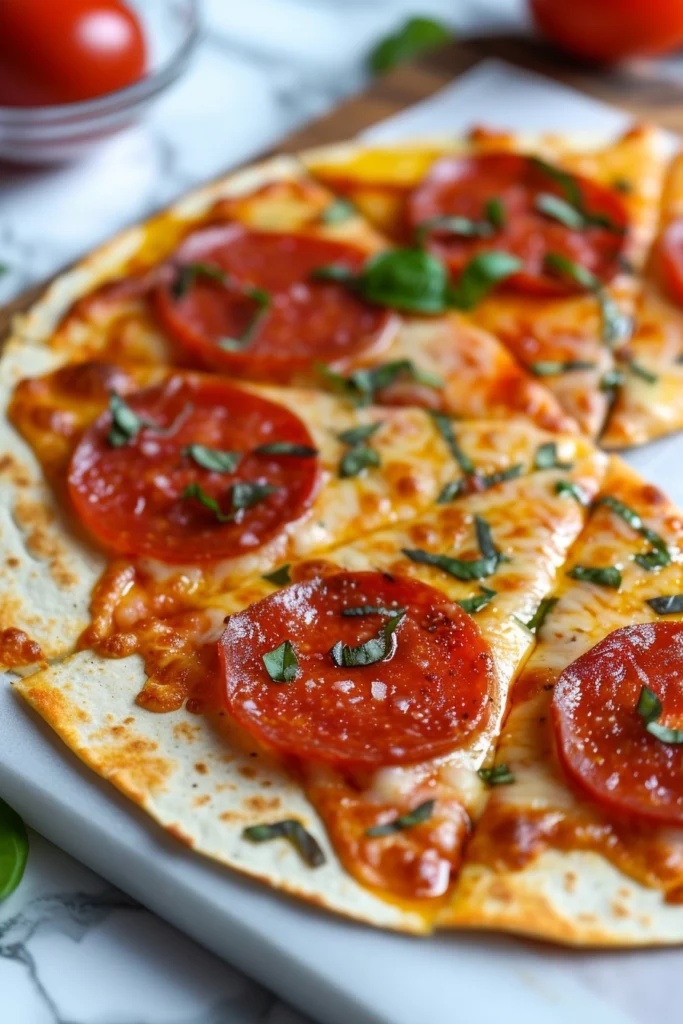
Preparing tortilla pizza is a simple way to bring creativity and taste to your school lunchbox. Here’s what you’ll need:
Ingredients:
- Tortillas (preferably whole grain for a healthier option)
- Tomato sauce
- Shredded mozzarella cheese
- Toppings of your choice (e.g., sliced bell peppers, onions, mushrooms, pepperoni)
- Olive oil (for brushing)
- Dried oregano or Italian seasoning
Instructions:
- Preheat your oven to 375°F (190°C).
- Brush the tortillas lightly with olive oil and place them on a baking sheet.
- Spread a thin layer of tomato sauce over each tortilla.
- Sprinkle mozzarella cheese on top of the tomato sauce.
- Add your favorite toppings, just as you would on a regular pizza.
- Season with a pinch of dried oregano or Italian seasoning for added flavor.
- Bake in the preheated oven for 8-10 minutes or until the cheese is bubbly and the edges are crispy.
- Cool slightly, then cut into wedges.
This recipe is flexible, allowing you to cater to your personal taste or dietary restrictions with ease. You can use a gluten-free tortilla if necessary, and for a cheese-free version, opt for a vegan cheese alternative. With tortilla pizza, you get a convenient, tasty, and adaptable meal that fits perfectly into your school lunchbox. Enjoy your personalized twist on a classic dish!
Hummus And Pita Dippers
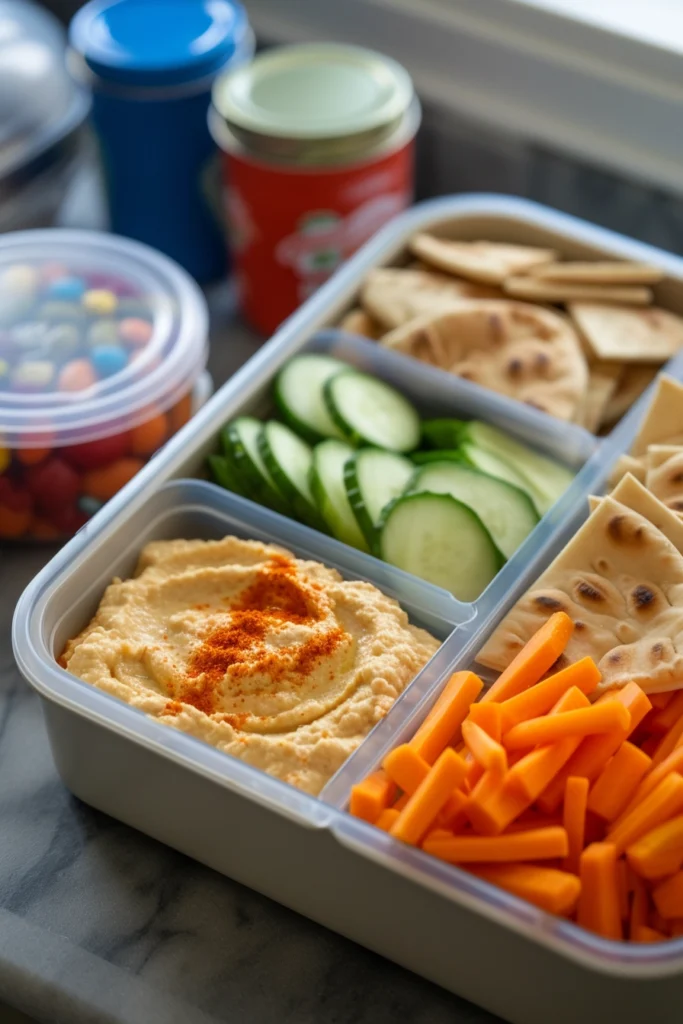
For a simple yet satisfying school lunch, hummus and pita dippers provide a balance of protein and whole grains that can keep you energized throughout the day. You’ll find that assembling this lunch is straightforward and allows for customization to your palate.
Ingredients:
- 1/2 cup of your favorite hummus
- 1 whole-wheat pita bread
- Sliced vegetables (carrots, bell peppers, cucumbers)
- A sprinkle of paprika or cumin (optional)
Instructions:
- Slice your whole-wheat pita bread into triangles, creating bite-sized pieces. Store them conveniently in a container or wrap them in foil to maintain freshness.
- Place your hummus in a separate airtight container. If you’d like, sprinkle your hummus with a dash of paprika or cumin to add an extra layer of flavor.
- Cut your vegetables into strips or sticks that are easy to dip. Pack them alongside your pita and hummus.
Serving Suggestions:
- Arrange your pita, hummus, and vegetables in your lunchbox for easy access.
- For a creamy alternative, you might mix a dollop of Greek yogurt into your hummus.
- Include a small ice pack to keep the hummus and veggies fresh until it’s time to eat.
Remember, the key to a great hummus and pita lunch is using fresh ingredients and including a variety of colors and textures with your vegetables. This not only makes your lunch more appealing but also ensures you’re getting a range of nutrients. Enjoy your delicious and healthful homemade lunch!
Carrot And Hummus “Sushi” Sandwiches
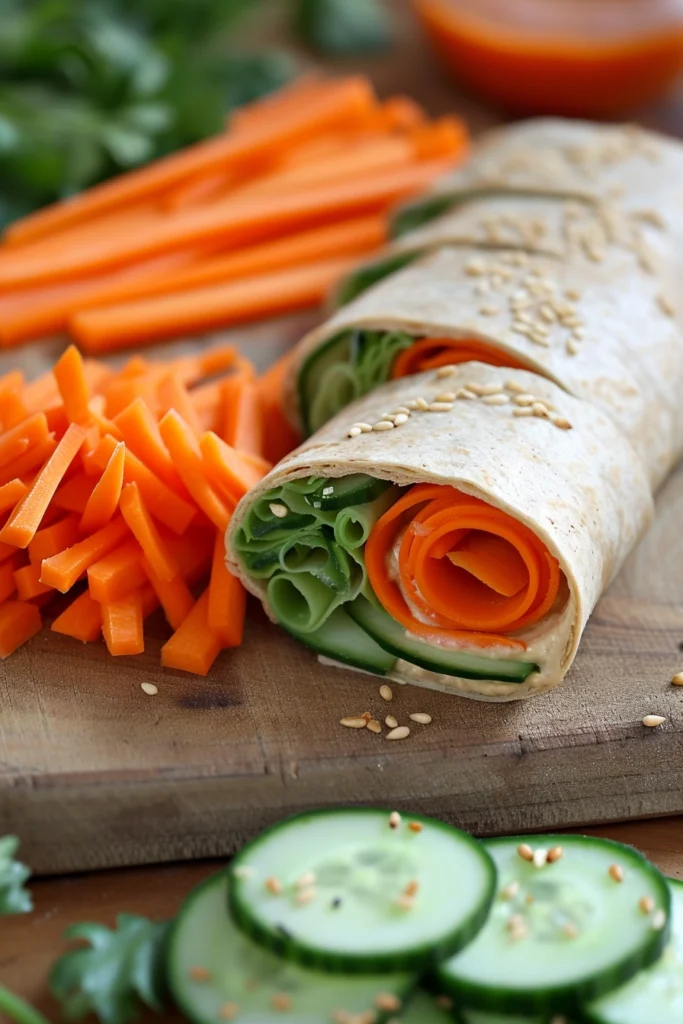
To begin, gather your ingredients:
- 2 large tortillas (whole wheat preferred)
- 1/2 cup hummus
- 1 large carrot
- 1 cucumber
- Optional: sesame seeds
Preparation Steps:
- Lay your tortillas flat on a clean surface.
- Spread the hummus evenly onto each tortilla, leaving a small border around the edges.
- Peel and then slice the carrot and cucumber into thin matchsticks.
- Arrange the carrot and cucumber sticks horizontally across the middle of the tortilla.
- If you have sesame seeds, sprinkle them over the veggies for added texture.
Rolling and Cutting:
- Carefully begin to roll the tortilla tightly over the vegetables, like a sushi roll.
- Ensure the roll is firm; a light dab of hummus can help seal the edge.
- Using a sharp knife, cut the roll into 1-inch sections.
Serving and Storage:
- Pack the “sushi” sandwiches snugly in a lunchbox compartment to keep them from unrolling.
- For best freshness, consume within 4 hours if not refrigerated, or keep chilled until lunchtime.
This fun twist on a sandwich is not only nutritious with fresh veggies and protein-rich hummus, but it also adds a playful element to lunchtime. It’s a simple and inventive way to enjoy a meal that requires no cooking, fits neatly into a lunchbox, and provides a healthful boost during your school day.
Turkey, Cranberry, And Brie Wraps

Creating turkey, cranberry, and brie wraps is a delightful way to spruce up your school lunch. This combination offers a balance of protein, sweetness, and creaminess.
First Mention
To begin, gather the following ingredients for your wrap:
- 2 large flour tortillas
- 4 slices of turkey breast
- ¼!– /wp:list-item –>
- 4 slices of brie cheese
- Lettuce leaves (optional)
- 1 tablespoon of mayonnaise (optional)
Instructions:
- Lay a tortilla flat on your work surface.
- Spread a thin layer of mayonnaise on the tortilla if desired.
- Place two slices of turkey breast onto each tortilla.
- Spread cranberry sauce evenly on top of the turkey.
- Add two slices of brie cheese onto each wrap.
- If you’re including lettuce, place a couple of leaves on top.
- Carefully roll the tortilla into a wrap, making sure the fillings are secure.
- Cut the wrap in half diagonally for easier handling.
Second Mention
Ensure your wrap stays fresh by storing it properly until lunchtime. Here’s what you can do:
- Wrap your turkey, cranberry, and brie wrap tightly in parchment paper or aluminum foil.
- Place it in a hard-sided lunchbox to prevent it from getting squished.
- Keep it cool with an ice pack if your lunchbox is not insulated.
These wraps are best enjoyed chilled or at room temperature. Enjoy the melding flavors of savory turkey, tangy cranberry, and creamy brie in every bite!
Avocado And Tuna Salad Wraps

Avocado and Tuna Salad Wraps are a nutritious and easy-to-make option for school lunches. They provide a good mix of protein, healthy fats, and fiber.
First Mention
To begin, gather the following ingredients for your avocado and tuna salad:
- 1 ripe avocado
- 1 can of tuna in water, drained
- 2 tablespoons of mayonnaise or Greek yogurt
- 1 teaspoon of lemon juice
- Salt and pepper to taste
- Whole wheat tortillas or your choice of wrap
- Optional additions: sliced cucumber, lettuce, tomato, or shredded carrot
Mash the avocado in a medium mixing bowl. Stir in the drained tuna, mayonnaise or Greek yogurt, and lemon juice. Add salt and pepper to taste. If you like, mix in some optional vegetables for extra crunch and nutrients.
Second Mention
Once your salad is mixed, here’s how to assemble the wraps:
- Lay out a tortilla or wrap.
- Spoon a portion of the avocado and tuna mixture onto the center.
- Add any additional vegetables you desire.
- Roll the wrap tightly, folding in the sides as you go to contain the filling.
- Cut the wrap in half for ease of eating and to fit in a lunchbox.
These wraps can be made the night before and stored in the fridge, making your morning routine simpler. Pack them with an ice pack in an insulated lunchbox to keep cool until lunchtime.
Paprika Parmesan Granola Bars
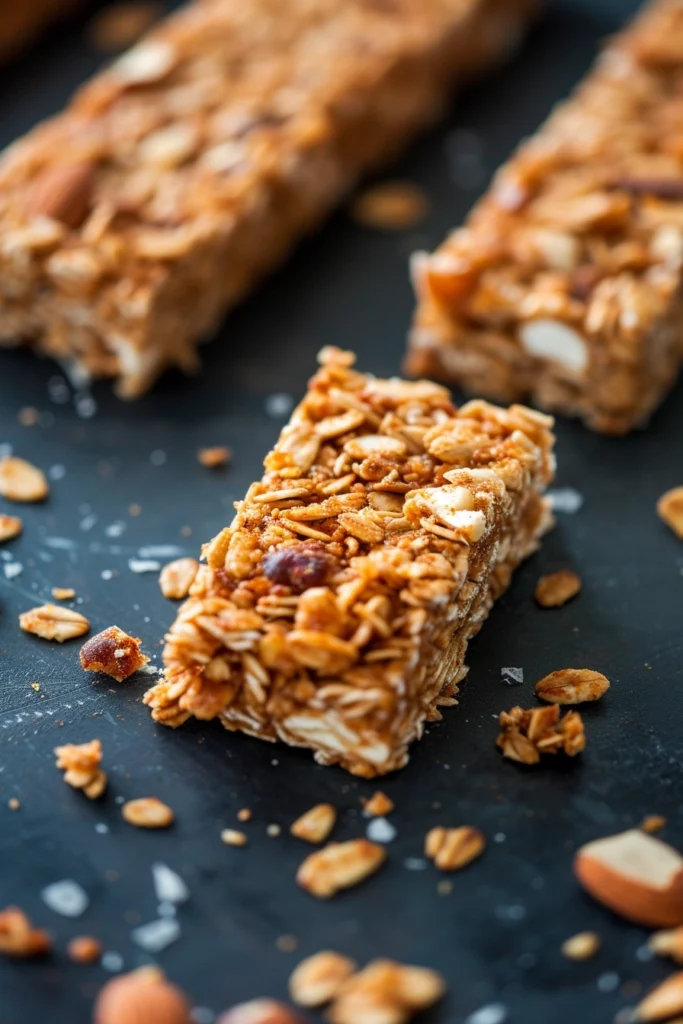
These homemade granola bars combine the savory flavors of parmesan and the smoky hint of paprika to create a unique, satisfying snack for school lunchboxes.
First Mention
To begin making your Paprika Parmesan Granola Bars, you will need the following ingredients:
- 2 cups rolled oats
- 1/2 cup grated parmesan cheese
- 1/4 cup honey or maple syrup
- 2 tablespoons olive oil
- 1/2 teaspoon smoked paprika
- 1/4 teaspoon garlic powder
- A pinch of salt
Instructions:
- Preheat your oven to 325°F (163°C).
- In a bowl, mix together the oats, parmesan, paprika, garlic powder, and salt.
- Add the honey and olive oil to the dry ingredients, stirring until evenly combined.
- Press the mixture firmly into a lined 9-inch square baking dish.
- Bake for 20-25 minutes or until golden brown.
- Allow to cool before cutting into bars.
Second Mention
Maintaining the tasty integrity of your Paprika Parmesan Granola Bars is crucial for an enjoyable lunchtime experience.
Storage Tips:
- Allow the bars to cool completely before storing.
- Keep them in an airtight container.
- Store at room temperature for up to one week; for longer shelf life, refrigerate.
Not only do these bars provide a delicious break from everyday snacks, but they also offer a good balance of whole grains and protein with a kick of flavor to brighten up your lunch.
Crunchy Fish Sticks And Veggies With Dipping Sauce

Pack a delicious and balanced meal with homemade crunchy fish sticks paired with fresh veggies and a flavorful dipping sauce.
First Mention
To start, gather your ingredients for the fish sticks:
- 1 lb white firm fish (e.g., cod or tilapia)
- 1 cup all-purpose flour
- 2 large eggs, beaten
- 2 cups panko breadcrumbs
- 1 tsp garlic powder
- Salt and pepper to taste
Preheat your oven to 400°F (200°C). Cut your fish into strips. Create an assembly line: flour seasoned with salt and pepper, beaten eggs, and panko mixed with garlic powder. Dip each fish strip into the flour, then the eggs, and finally coat with the panko mixture. Place on a baking sheet lined with parchment paper and bake for 12-15 minutes until golden and crispy.
Second Mention
While the fish sticks are baking, prepare the veggies and dipping sauce.
For the veggies, select a variety of colors and textures:
- Carrot sticks
- Cucumber slices
- Cherry tomatoes
- Bell pepper strips
For the dipping sauce, mix:
- 1/2 cup of Greek yogurt
- 2 tbsp mayonnaise
- 1 tbsp lemon juice
- 1 tsp honey
- 1/2 tsp dried dill
- Salt and pepper to taste
Combine all ingredients in a small bowl and whisk together until smooth. Serve the baked fish sticks with the fresh veggies and dipping sauce on the side for a nutritious and satisfying school lunch.
Spiced Banana-Chocolate Muffins

Brighten up your school lunchbox with the sweet and spicy twist of Spiced Banana-Chocolate Muffins. A perfect combination of ripe bananas with a rich chocolate flavor, complemented by warming spices, makes these muffins a delightful treat.
First Mention
Ingredients:
- 3 ripe bananas, mashed
- 1/2 cup (115g) unsalted butter, melted
- 3/4 cup (150g) sugar
- 1 large egg, beaten
- 1 teaspoon vanilla extract
- 1 teaspoon baking soda
- Pinch of salt
- 1 1/2 cups (190g) all-purpose flour
- 1 teaspoon ground cinnamon
- 1/2 teaspoon ground nutmeg
- 1/4 teaspoon ground cloves
- 1/2 cup (85g) chocolate chips
Instructions:
- Preheat your oven to 350°F (175°C) and line a muffin tin with paper liners.
- In a large bowl, whisk together the melted butter and mashed bananas.
- Add sugar, egg, and vanilla extract, mixing well.
- Sprinkle baking soda and salt over the mixture, and then blend in the flour.
- Stir in the cinnamon, nutmeg, and cloves, followed by the chocolate chips.
- Pour the batter into the muffin liners until each is about two-thirds full.
- Bake for 20-25 minutes or until a tester inserted into the center comes out clean.
Second Mention
To enjoy your Spiced Banana-Chocolate Muffins at their best, consume them within two days of baking. For longer storage, wrap them individually and freeze. When it’s time to pack your school lunch, simply add a muffin to your lunchbox; it will thaw by lunchtime, providing a fresh and delightful snack for your school day.
Curried Turkey, Apple, And Watercress Sandwich

The Curried Turkey, Apple, and Watercress Sandwich combines savory, sweet, and peppery flavors for a refreshing lunch option.
First Mention
The ingredients you’ll need are straightforward and nutritious. Align your ingredients to achieve the perfect balance of flavors:
- Curried Turkey
- Sliced turkey breast – 2 ounces
- Curry powder – 1 teaspoon
- Apple
- Green apple, thinly sliced – 1/2 apple
- Watercress
- Fresh watercress – a handful
- Bread & Spreads
- Whole grain bread – 2 slices
- Mayonnaise or greek yogurt – 1 tablespoon
- Mango chutney – 1 tablespoon
First, season your turkey slices with curry powder and set aside. Next, wash your watercress and pat it dry. For the apple, pick a firm and tart green apple, as it provides a crisp texture and a sweet-tart compliment.
Second Mention
Constructing your sandwich carefully will ensure each ingredient shines:
- Lay out the two slices of bread.
- Spread mayonnaise or Greek yogurt on one slice and mango chutney on the other.
- Arrange the curried turkey slices on the slice with mayonnaise or Greek yogurt.
- Place the thinly sliced apple pieces on top of the turkey.
- Add a layer of fresh watercress.
- Finally, close the sandwich with the other slice of bread.
Slice the sandwich diagonally for ease of handling and to show off the colorful layers within. Enjoy the dynamic combination of spiced turkey with the refreshing crunch of apple and watercress.
Lunch Box Roll-Ups and Pinwheels

Roll-ups and pinwheels are a fun and easy-to-eat option for your school lunch box. They can be filled with a variety of ingredients to suit your taste and nutritional needs. Below are some ideas to get you started:
Turkey and Cheese Roll-Ups
- Lay out a whole wheat tortilla.
- Spread a layer of cream cheese over the tortilla.
- Add slices of turkey and a slice of cheese.
- Roll up the tortilla tightly and slice into pinwheels.
Veggie-Packed Pinwheels
- Take a spinach tortilla.
- Spread hummus evenly across the surface.
- Arrange thinly sliced vegetables like cucumber, bell peppers, and carrots.
- Roll it up, press gently, then cut into bite-sized pieces.
Peanut Butter Banana Roll-Ups
- Use a regular flour tortilla.
- Spread a thin layer of peanut butter.
- Place a whole banana near the edge and roll up.
- Slice into rounds and enjoy.
For all these options, remember to pack them tightly in your lunch box to keep them fresh. Here is a quick table with the key ingredients:
| Roll-Up Type | Base | Spread | Filling |
|---|---|---|---|
| Turkey and Cheese | Wheat tortilla | Cream cheese | Turkey, Cheese |
| Veggie Packed | Spinach tortilla | Hummus | Cucumber, Peppers, Carrots |
| Peanut Butter Banana | Flour tortilla | Peanut butter | Banana |
Mix and match ingredients to your preference and dietary restrictions. These roll-ups provide a balanced meal with protein, fiber, and healthy fats, all while being convenient and mess-free for eating at school.
Meat And Cheese Stackers

For a tasty and fun lunch, try creating your Meat and Cheese Stackers. This choice allows you to mix flavors and textures while providing a good source of protein and calcium.
Ingredients:
- Slices of deli meat (turkey, ham, roast beef)
- Assorted cheese slices (cheddar, Swiss, mozzarella)
- Crackers (whole grain or your choice)
- Cherry tomatoes
- Cucumber slices
- Lettuce leaves
Instructions:
- Begin by selecting your favorite slices of deli meat. Go for low-sodium options if you’re watching your salt intake.
- Choose several kinds of cheese to add variety.
- Wash your cherry tomatoes and cucumber, then slice the cucumber into thin rounds.
- Lay out all of your ingredients for easy assembly.
Assembly:
- Place a cracker down as your base.
- Add a piece of lettuce, followed by your choice of meat, then a slice of cheese.
- Top with another cracker to create a mini sandwich stacker.
Serving Tip:
Pack the ingredients separately in your lunchbox. When it’s time to eat, you can have fun building your stackers just the way you like them. This keeps everything fresh and prevents the crackers from getting soggy.
Variation:
For a twist, try using different types of crackers or bread, like pita pockets or mini bagels, to hold your meat and cheese. Add a small container of mustard or hummus for an extra punch of flavor when assembling your stackers at lunch.
Nibble Plates
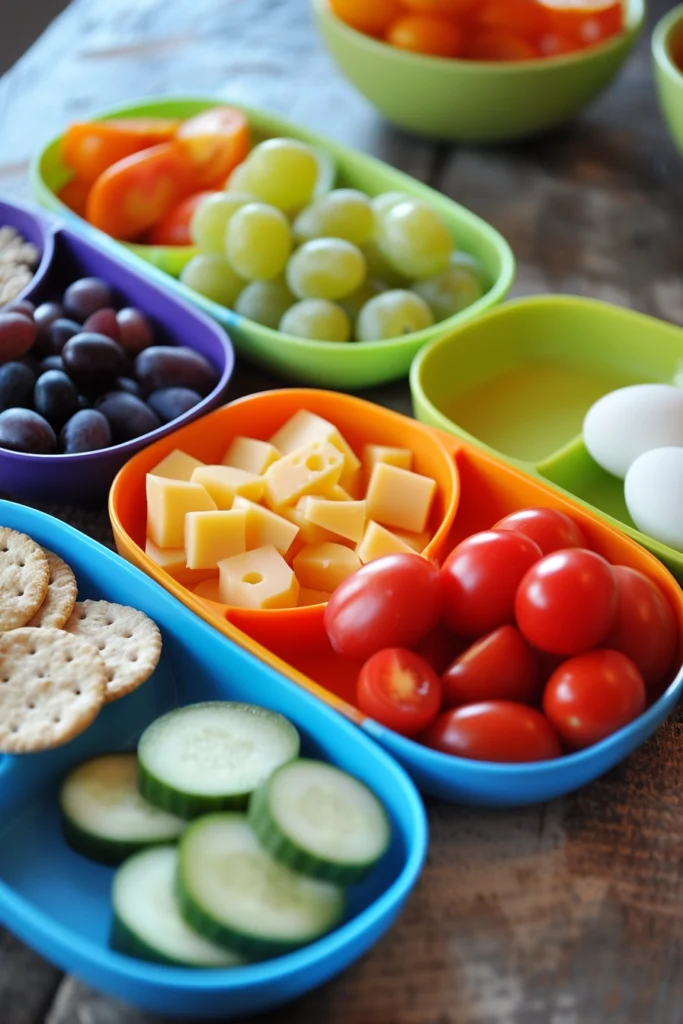
Nibble Plates offer variety and balance, allowing your child to have a little taste of everything. These are perfect for kids who prefer grazing over a traditional lunch or enjoy a selection of finger foods.
Ingredients:
- Cubed cheese
- Turkey or ham slices
- Whole-grain crackers
- Cherry tomatoes
- Cucumber slices
- Seedless grapes
- Hard-boiled eggs
Instructions:
- Start by cutting the cheese into small cubes and roll up the turkey or ham slices. These proteins are satisfying and essential for growth.
- Provide whole-grain crackers for a crunchy fiber source; they pair nicely with cheese and meats.
- Include a portion of cherry tomatoes and cucumber slices; they add a refreshing crunch and contribute to daily vegetable intake. Wash them well and cut into bite-sized pieces.
- Add a small bunch of seedless grapes or any seasonal fruit. Fresh fruit provides necessary vitamins and a sweet treat.
- Peel and slice a hard-boiled egg into quarters. Eggs are an excellent source of protein and other nutrients.
| Food Category | Suggestions |
|---|---|
| Protein | Cheese, Turkey, Eggs |
| Carbohydrates | Crackers |
| Vegetables | Tomatoes, Cucumbers |
| Fruit | Grapes |
Remember to keep portions child-friendly. Using colorful picks or skewers can make the plate more engaging. Utilize bento boxes or divided containers to keep the food organized and avoid sogginess. This approach to lunch is not only visually appealing but also encompasses various food groups, ensuring a well-rounded meal.
Sandwich Cut-Outs
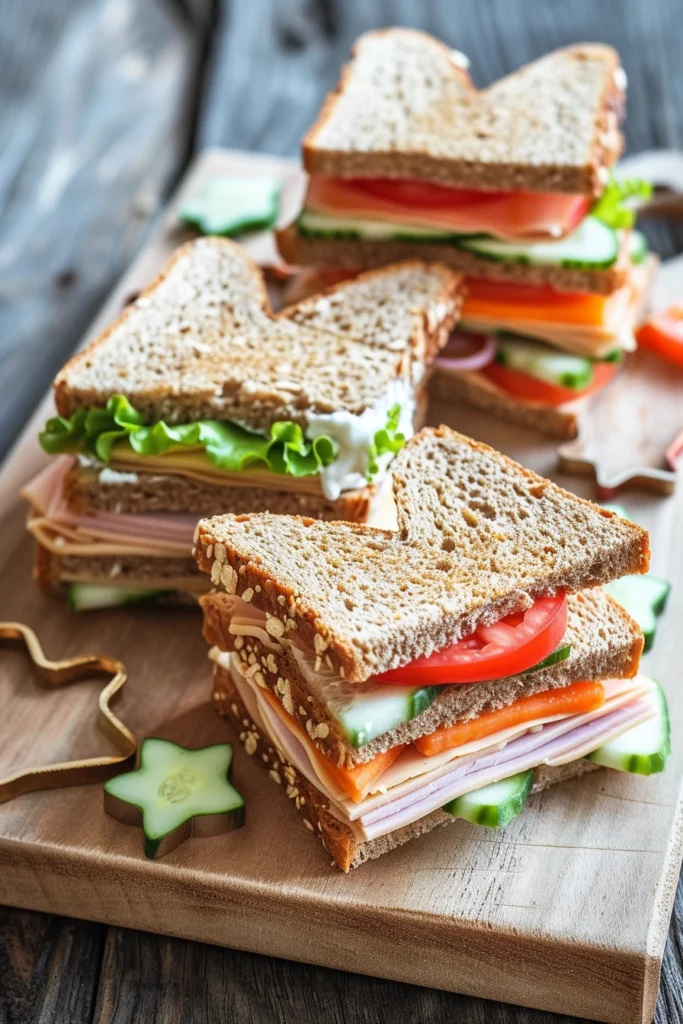
Making lunch fun can be as simple as adding creativity to a classic sandwich. Start with your favorite whole grain bread, add a layer of lean protein, and don’t forget the veggies for a nutritious meal.
Ingredients:
- Whole grain bread
- Turkey breast/ham/chicken
- Cheese slices
- Lettuce
- Tomato
- Cucumber
- Sandwich spread of your choice
Instructions:
- Choose your fillings and generously layer them between two slices of bread.
- Use sandwich cutters or cookie cutters to press out fun shapes from your sandwich.
- Combine different sizes and shapes to make the lunch box visually appealing.
| Shape | Idea |
|---|---|
| Stars | Use for a space-themed lunch |
| Hearts | Perfect for a love-filled meal |
| Animals | Delight animal lovers |
| Puzzle pieces | Add a playful twist to sandwich bites |
Pro Tips:
- Lightly toast the bread to add crunch and prevent sogginess.
- Apply a thin layer of spread on each slice to enhance flavors.
- Keep cut-outs tightly packed to minimize waste.
- Mix and match cutter shapes for a fun and varied presentation.
Remember to pack these alongside fruits, nuts, or yogurt to round out a balanced meal. Enjoy your creatively crafted sandwich cut-outs and watch them become the envy of the lunchroom!
Fruit Salad

For a refreshing and nutritious addition to your school lunch, consider packing a fruit salad. You can easily customize it with your favorite fruits, ensuring it’s always a hit. Here’s a simple recipe to get you started:
Ingredients:
- 1 apple: diced
- 1 banana: sliced
- 1/2 cup grapes: halved
- 1 orange: segmented
- 1/2 cup strawberries: halved
- 1/4 cup blueberries
- 1 tablespoon lemon juice: to prevent browning
Instructions:
- Begin by washing all the fruits thoroughly.
- Dice the apple, slice the banana, and cut the grapes and strawberries in half.
- Peel the orange and separate it into segments, then add all your prepared fruits to a medium-sized bowl.
- Drizzle with lemon juice and gently toss the salad to ensure the fruit is coated; this will keep the fruit fresh and vibrant in color.
- Refrigerate the fruit salad until it’s time to pack it in your lunch. Use an airtight container to maintain freshness.
Tips:
- For variety, try adding other fruits like kiwi, pineapples, or melon.
- If you desire a little sweetness, a drizzle of honey or a sprinkle of cinnamon can add an extra flavor without overwhelming the fruits.
- To maintain optimum freshness, prepare your fruit salad the night before or the morning of school.
Pack this fruit salad to enjoy a sweet, juicy, and healthful midday treat. It’s an excellent way to include a serving of fruits in your daily diet, and its natural sugars provide a quick energy boost.
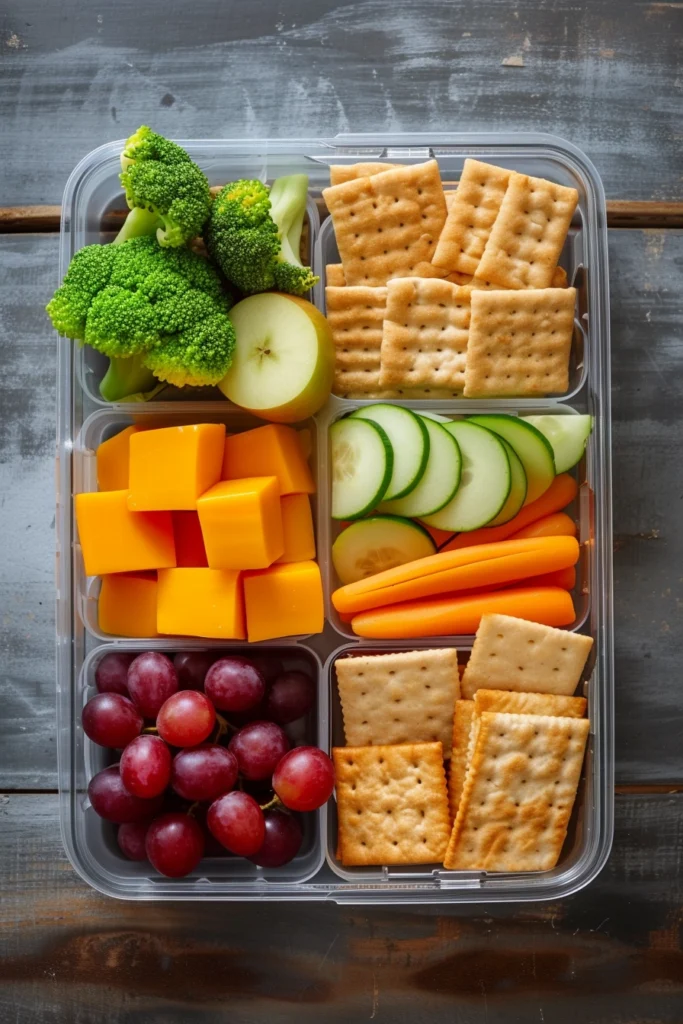
Veggies With Dip

Preparing veggies with dip is a convenient and nutritious option for your school lunch. Choose a variety of colorful vegetables to make the meal more appealing and to provide a range of vitamins and minerals.
Ingredients:
- Carrot sticks
- Cucumber slices
- Cherry tomatoes
- Bell pepper strips
- Broccoli florets
- Cauliflower pieces
- Your favorite dip (hummus, ranch, yogurt-based dressing)
Instructions:
- Wash all vegetables thoroughly.
- Cut carrots, cucumber, and bell peppers into stick shapes for easy dipping.
- Keep cherry tomatoes whole or halve them if preferred.
- Separate broccoli and cauliflower into bite-sized florets.
- Choose a small container for your dip to prevent spills.
- Pack vegetables and dip into separate compartments of your lunch box to keep them fresh.
Tips:
- Try different dips throughout the week for variety.
- Pack a small ice pack to keep the veggies and dip cool and fresh until lunchtime.
- If time allows, prepare your veggies the night before to make your morning routine quicker.
Yogurt
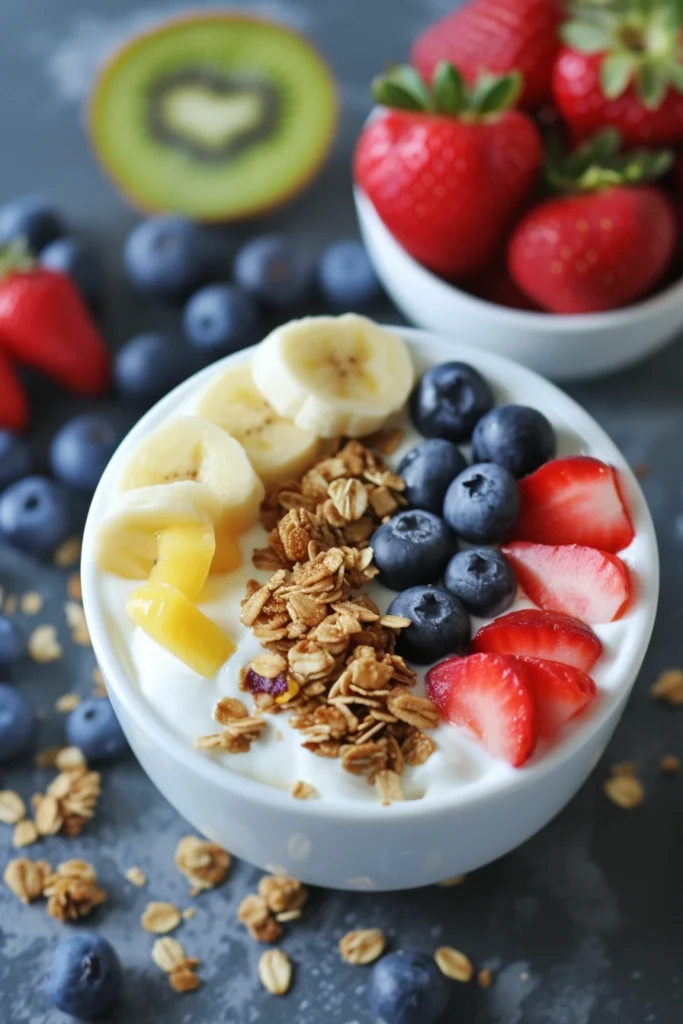
Packing yogurt in your lunchbox can be both a nutritious and delicious choice. Yogurt is rich in calcium and protein, and can be a great way to keep you energized throughout the school day. Here are a few ways you can incorporate yogurt into your lunch.
Fruit Yogurt Parfait
- Layer plain Greek yogurt with your favorite fruits like strawberries, blueberries, or bananas.
- Add a layer of granola for a crunchy texture.
- Drizzle a small amount of honey for sweetness if desired.
Yogurt Dip
- Mix plain yogurt with herbs like dill or chives to create a tasty dip.
- Pair with carrot sticks, cucumber slices, or cherry tomatoes for a healthy snack.
| Ingredient | Quantity | Purpose |
|---|---|---|
| Plain Yogurt | 1 cup | Base for dips or parfaits |
| Fresh Fruit | 1/2 cup | Natural sweetness and fiber |
| Granola | 1/4 cup | Crunch and texture |
| Honey | 1 tablespoon | Optional sweetener |
| Herbs (Dill/Chives) | To taste | Flavor for dips |
Remember to choose a yogurt that’s low in added sugars. Read the labels to ensure you’re picking a healthy option. For convenience, use small containers or mason jars to separate your ingredients until you’re ready to eat. This keeps everything fresh and prevents sogginess. Enjoy your yogurt as a stand-alone snack or as part of a balanced lunch.
Cheese
Cheese is a versatile ingredient that can elevate your school lunches. It’s rich in calcium and protein, making it a nutritious choice for growing bodies.
Ingredients:
- Cheddar cheese
- Mozzarella sticks
- Cream cheese
- String cheese
Here are a few ways to incorporate cheese into your lunchbox:
Cheese Cubes
- Cube cheddar cheese and pack with whole grain crackers.
- Pair with sliced apples or grapes for a sweet and savory snack.
Mozzarella Sticks
- Pack individually wrapped mozzarella sticks for a convenient option.
- Dip in marinara sauce for added flavor.
Cheese Sandwich
- Spread cream cheese on whole wheat bread.
- Add cucumber slices for crunch.
- Cut into fun shapes with cookie cutters.
Cheesy Vegetables
- Toss steamed broccoli with melted cheddar cheese.
- Cool before packing to avoid sogginess.
String Cheese
- Include a string cheese as a fun, peelable snack.
- Pair with a small handful of nuts for extra protein.
Use a cold pack to keep the cheese fresh until lunchtime. To add variety, rotate these options throughout the week. Keep portions appropriate for a balanced meal.
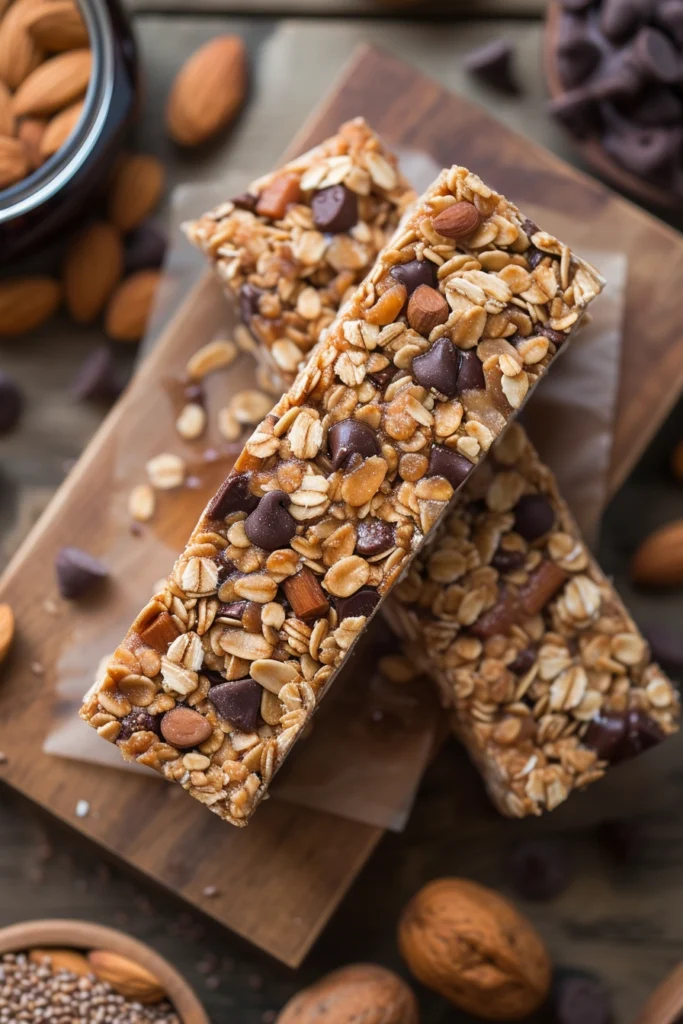
Granola Bars
Granola bars are a convenient and nutritious option for your school lunchbox. They can be made ahead and easily customized to your taste preferences. Here’s a basic recipe to get you started:
Ingredients:
- 2 cups of rolled oats
- 1/2 cup of nuts (almonds, walnuts, or pecans), chopped
- 1/4 cup of honey or maple syrup
- 1/4 cup of butter or coconut oil
- 1/2 cup of dried fruit (raisins, cranberries, or chopped apricots)
- 1/4 cup of seeds (sunflower or pumpkin seeds)
- 1/2 teaspoon of vanilla extract
- Pinch of salt
Instructions:
- Preheat your oven to 350°F (175°C).
- Spread the oats and nuts on a baking sheet and toast in the oven for 8-10 minutes until slightly golden; transfer to a mixing bowl.
- In a saucepan, heat honey or syrup and butter or oil until melted and combined. Stir in vanilla extract and salt.
- Pour the liquid mixture over the oats and nuts. Add dried fruit and seeds. Stir until well mixed.
- Line an 8-inch square baking dish with parchment paper. Transfer the granola mixture to the dish and press down firmly to create an even layer.
- Bake for 20-25 minutes. Cool completely in the dish, then refrigerate to firm up before cutting into bars.
Tips:
-
Use bold for key ingredients or steps to emphasize their importance.
-
For a nut-free version, substitute nuts with extra seeds or soy nut butter.
-
Customization:
Add-ins Quantity Recommended Chocolate chips 1/4 cup Chia seeds 2 tablespoons Flaxseed (ground) 2 tablespoons Cinnamon or nutmeg (spices) 1/4 teaspoon
Remember to store your homemade granola bars in an airtight container to maintain freshness. Enjoy as a mid-morning snack or part of a balanced lunch!
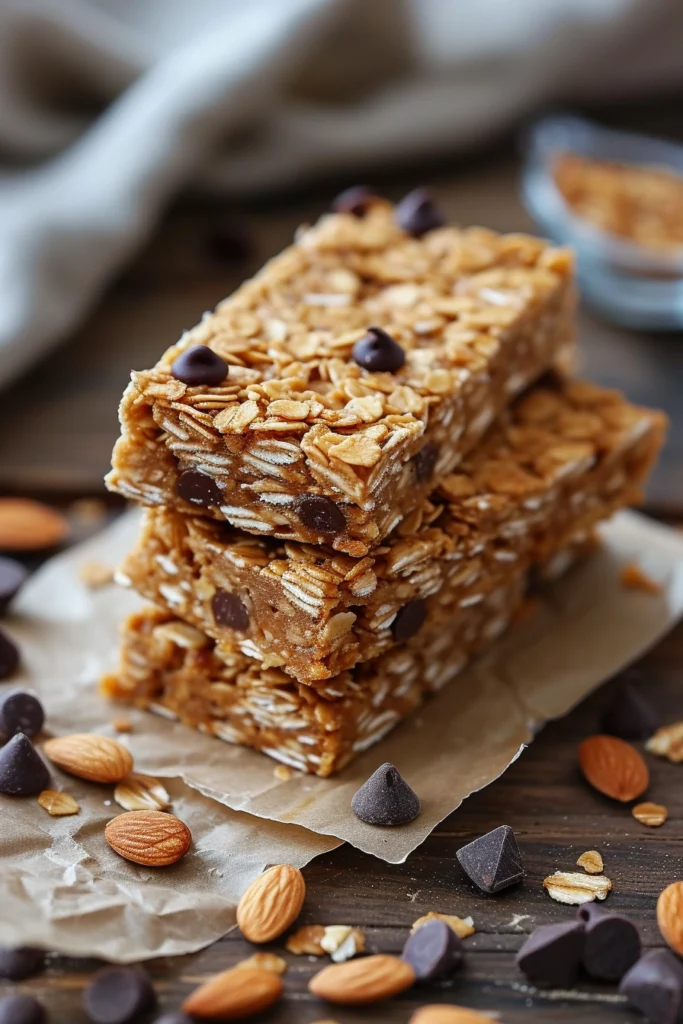
Almond Butter Granola Bars
When you’re in a rush and need a snack that’s both nutritious and satisfying for school, almond butter granola bars can be your go-to option. They’re easy to make and can be a great source of energy.
Ingredients:
- 1 cup almond butter
- ½ cup honey or maple syrup
- 2 ½ cups rolled oats
- ½ cup ground flaxseed
- ½ cup mini chocolate chips
- 1 tsp vanilla extract
- A pinch of salt
Instructions:
- In a medium-sized pot, warm the almond butter and honey (or maple syrup) over low heat until they blend together smoothly.
- Remove the pot from the heat and stir in the vanilla extract.
- In a separate bowl, mix the rolled oats, ground flaxseed, chocolate chips, and salt.
- Combine the oat mixture with the melted almond butter and honey. Ensure everything is evenly coated.
- Press the mixture into a lined 8-inch square baking pan. Press down firmly to make sure the bars hold together.
- Refrigerate for at least one hour to set.
- Once set, cut into bars or squares.
Packing Tips:
Wrap individual granola bars in parchment paper and store them in an airtight container. They can last in your fridge for up to a week or in your freezer for a longer shelf life. Grab one on your way out for a convenient and tasty school snack.

Hi, I'm Benjamin. I love cooking, long walks, and my girlfriend! Here you’ll find simple and delicious recipes that you can make in 30 minutes or less.