
Discover the secret to perfect Air Fryer Chicken Thighs with a recipe that combines easy preparation and culinary finesse. Crispy skin, juicy meat, and a few simple steps are all it takes to turn this dish into a household favorite.
Dive into the tips and tricks that transform this meal from ordinary to extraordinary, and see why it’s not just about eating, but savoring each bite.
10 Best Sauces for Chicken Thighs
18 Spices for Chicken Thighs That Will Transform Your Meal
Air Fryer Chicken Thighs
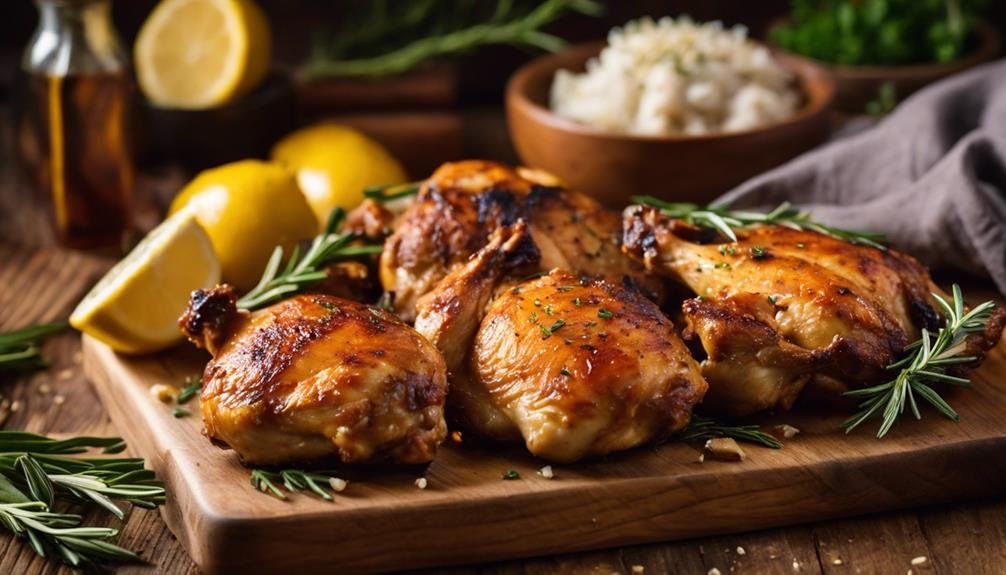
Whenever I’m craving that perfect combination of crispy and juicy chicken thighs but want to skip the mess and hassle of oil frying, my air fryer is my go-to kitchen hero. It’s completely changed the game for me, making cooking feel less like a chore and more like a fun experiment. The way it circulates hot air around the chicken ensures every thigh is cooked just right, with that crave-worthy crispy exterior. Plus, it’s such a time-saver, especially on those evenings when time just isn’t on my side.
Air frying chicken thighs is a game changer for me because it keeps them so juicy inside, while also cutting back on the oil, making this method a healthier alternative to the traditional deep-frying. I love that I can say goodbye to oil splatters and a greasy kitchen to clean up. And speaking of clean-up, the non-stick basket makes it so easy, it’s almost like there’s no cleanup at all.
The best part? Chicken thighs are like a blank canvas, ready to take on whatever flavors you’re in the mood for. Whether I’m craving something with a kick, a bit of sweetness, or a savory masterpiece, just a few seasonings can turn it into a mouthwatering dish. It’s amazing how this compact little appliance has completely transformed my approach to meal prep, letting me explore a world of flavors without sacrificing on the quality or texture of the food.
How To Make
Now, I’ll walk you through the process of making air fryer chicken thighs.
First up, we’ll cover the essential ingredients you need to gather.
Then, I’ll guide you step-by-step through the instructions to ensure your chicken turns out perfectly crispy and juicy.
Ingredients You’ll Need
Whipping up some mouthwatering air fryer chicken thighs is easier than you might think, and it all starts with having the right ingredients on hand. Here’s what I always make sure to grab:
- Chicken Thighs: I go for bone-in and skin-on ones because they’re just so much juicier and packed with flavor.
- Olive Oil: A little drizzle helps the seasonings cling to the chicken and gets that skin nice and crispy.
- Your Go-To Seasoning Blend: This is your chance to get creative. Whether you’re all about keeping it simple with salt and pepper or you want to kick things up a notch with some heat, it’s all good.
- Garlic Powder: I can’t resist adding this for that extra flavor kick that goes so well with chicken.
With these ingredients, you’re all set to make a dish that’s sure to win everyone over.
Instructions
Ready to make some mouthwatering air fryer chicken thighs? Let’s dive in.
First things first, we’re going to preheat our air fryer to 400°F. This step is key because it sets us up for even cooking right from the get-go.
Next up, let’s tackle those chicken thighs by patting them dry with paper towels. Why? Because we’re all about that crispy skin life, and getting rid of any excess moisture is essential.
After drying, it’s time to get generous with the spice mix, covering every inch of the chicken with flavor.
I’ve found the best way to arrange them in the air fryer basket is skin-side down without any overlap, ensuring they all get that golden touch.
We’ll let them sizzle for about 10 minutes, then flip and continue cooking until they hit that perfect internal temperature of 165°F, which usually takes another 10 minutes.
And there you have it—perfectly cooked air fryer chicken thighs ready to impress.
Tips For Success
Ensuring your air fryer chicken thighs turn out perfectly starts with preheating the appliance to the right temperature. I’ve discovered that getting that juicy inside and crispy skin isn’t just luck; it’s about mastering a few key steps. Here’s what I’ve learned:
- Pat the Chicken Dry: Before seasoning, I always pat the chicken thighs dry with paper towels. Removing excess moisture helps the skin get really crispy.
- Season Generously: Don’t be shy with your seasonings. I make sure to rub the spices well into both sides of the chicken thighs. This not only flavors the meat but also contributes to a delicious crust.
- Don’t Overcrowd: It’s tempting to throw as many thighs in the basket as possible, but I’ve found that leaving space between them ensures they cook evenly and get that desirable crispiness all around.
- Flip Halfway Through: This might seem obvious, but flipping the thighs halfway through cooking ensures an even crisp and cooks them thoroughly.
Following these steps has consistently given me mouthwatering results. The key is paying attention to the details that make a big difference in the outcome.
Serving Suggestions
Once you’ve gotten the hang of whipping up some delicious air fryer chicken thighs, finding the perfect accompaniments can really make your dinner pop.
I usually lean towards a crisp, light salad to cut through the chicken’s savory depth. Tossing together some arugula, cherry tomatoes, and a zesty vinaigrette is my go-to. It’s a breeze to prepare while the chicken is settling, making sure everything’s table-ready simultaneously.
When I’m in the mood for something a bit more substantial, I turn to roasted veggies. Whether it’s carrots, Brussels sprouts, or sweet potatoes, giving them a good seasoning and roasting them until they’re just right makes for a fantastic pairing with the chicken’s crunchy skin and succulent meat.
On those nights when only comfort food will do, I can’t go past a bowl of garlic mashed potatoes. Their smooth texture and punchy flavor are a match made in heaven with the chicken, elevating the whole meal to something truly special. And for those times I’m after a lighter touch, a serving of quinoa or a wild rice blend acts as a great, nutritious base that lets the chicken shine without overpowering it.
Choosing sides always comes down to striking a balance in the meal, be it through introducing a fresh component or mixing up the textures. It’s all about transforming a straightforward dish of chicken thighs into a complete, utterly satisfying feast.
Storing, Freezing & Reheating
After savoring a delicious meal of air fryer chicken thighs paired with your favorite sides, it’s crucial to know the best practices for storing, freezing, and reheating any leftovers to ensure they remain as tasty as when first served. Here’s my personal method:
- Cooling Down: The first step I always take is to let the chicken thighs cool down to room temperature before even thinking about storing them. This step is key to avoiding condensation inside the storage container, which could turn the chicken soggy.
- Refrigeration: If I’m planning to enjoy the leftovers within a few days, I transfer them into an airtight container and pop them in the fridge. They’ll stay perfectly good for up to four days.
- Freezing: For keeping them longer, I wrap each thigh individually in plastic wrap, then place them all in a freezer bag. This keeps them fresh for up to four months. I make sure to label the bag with the date so I can keep track of how long they’ve been stored.
- Reheating: When it’s time to reheat, I go back to the air fryer to keep the skin nice and crispy. I set it to 375°F and warm the thighs for about 10 minutes, or until they’re heated all the way through. If they’re coming from the freezer, I’ll thaw them in the fridge overnight before reheating.
Following these steps ensures that my air fryer chicken thighs are just as enjoyable the second time around!

Hi, I'm Benjamin. I love cooking, long walks, and my girlfriend! Here you’ll find simple and delicious recipes that you can make in 30 minutes or less.